
Guides/Drawing standards
Rename and Merge Layers Across Many Drawings to Your Company Layer Standard
 Made with LayerSync
Updated September 29, 2026
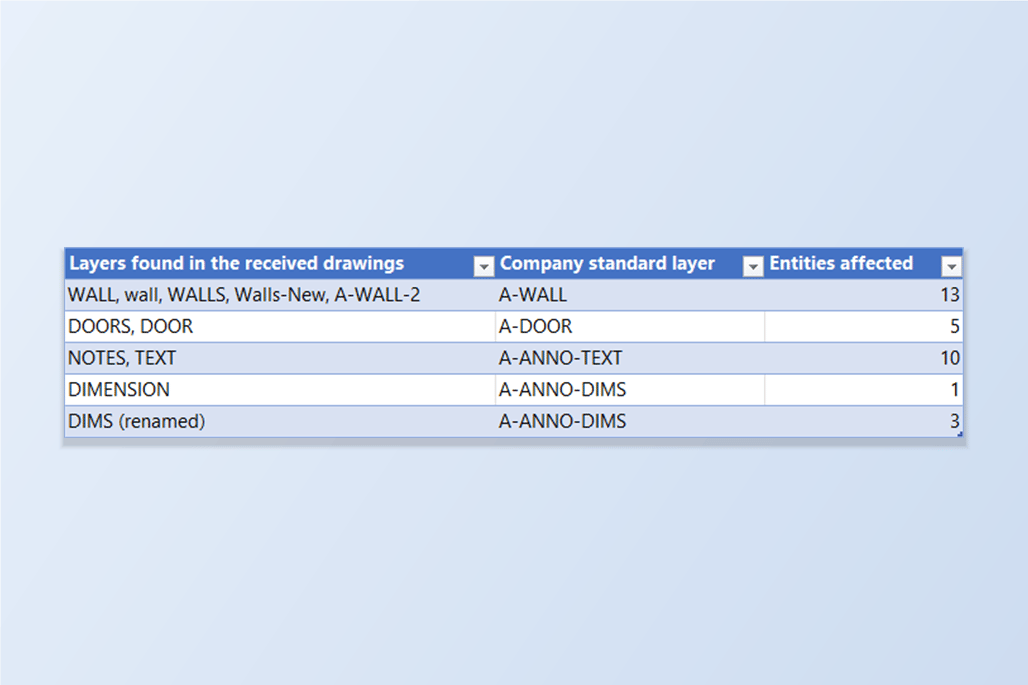
Every consultant names layers their own way. The architect's walls are on A-WALL, the engineer's are on WALL, somebody added Walls-New, and one drawing has wall in lower case. Before the set can be plotted, checked against a standard or reused, they all have to become your layer names — in every drawing.
AutoCAD has LAYMRG and the Layer Translator for this, but both work on one open drawing at a time, so forty drawings means repeating the same mapping forty times — or writing a script. What you want is the mapping typed once and applied to the whole set.
This guide uses LayerSync. It reads the layers of every drawing into one grid, or one Excel sheet, where you type the layer each stray layer should merge into; it shows exactly what will move, and writes all the drawings in one run with a backup first. The example is four drawings from different sources; the Free tier handles up to 10 drawings per run.
1. Read every layer of every drawing
Open LayerSync in AutoCAD → Excel mode and add the drawings with Add Files… or Add Folder…. The Layers tab lists one row per layer per drawing, with how many objects are on it and its color, linetype and states. Here the four drawings have 31 layers between them.
The Search box accepts * and ? wildcards, which makes the mess visible: *wall* shows every spelling of the wall layer across the set. Each drawing has the standard A-WALL, and next to it WALL, Walls-New, wall, WALLS and A-WALL-2.
2. Export to Excel and fill in Merge Into
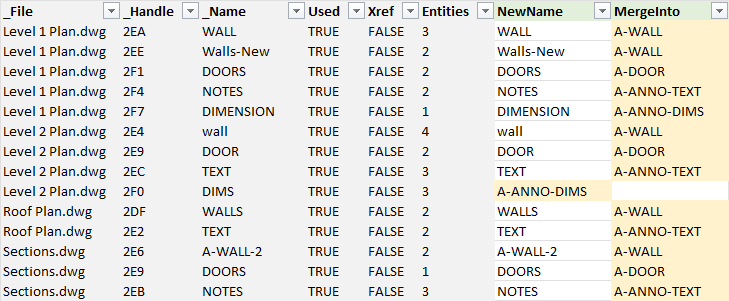
Clear the search box and click Export to Excel…. The workbook's Layers sheet has the same rows, and two columns are yours to edit: NewName renames the layer, and MergeInto moves every object on the layer onto another layer and then removes the emptied layer. Type the standard layer's name in MergeInto for each stray layer — filter the sheet by layer name and fill down.
In this example 13 rows get a MergeInto value, so WALL, wall, WALLS, Walls-New and A-WALL-2 all go to A-WALL, DOOR and DOORS to A-DOOR, NOTES and TEXT to A-ANNO-TEXT, DIMENSION to A-ANNO-DIMS. A layer that has no standard twin in its own drawing needs a rename instead: Level 2 Plan has DIMS but no A-ANNO-DIMS, so its NewName is A-ANNO-DIMS. Save the workbook next to the drawings.
3. Preview before anything is written
Switch to Excel → AutoCAD and pick the workbook. The DWG folder defaults to the workbook's folder, and rows are matched to drawings by file name and layer handle. The Diff Preview lists each drawing with its number of changes — here 14 changes across four drawings, none blocked.
Select a drawing to see its Layers tab. A Merge preview panel regroups the merges by target: A-WALL ← WALL, Walls-New — 2 layer(s) merging in, and so on, then the row-by-row list below it. A row that can't be written is marked Cannot write with the reason (for example the target layer doesn't exist in that drawing) instead of being skipped silently. Leave Automatic backup on.
4. Write all the drawings in one run
Tick the drawings and click Write Selected Files. Each drawing is copied to the backup folder first, then written: the objects of every merged layer are moved to the target layer — including objects inside block definitions — and the emptied layer is removed. LayerSync then reopens each saved file and compares what is stored with what was intended.
The Write Report shows every drawing succeeded — 10, 8, 5 and 8 layer rows written, no failures, no mismatches. If a layer being merged away happens to be the drawing's current layer, the target layer becomes current, so it can be removed.
5. Check the result
Go back to AutoCAD → Excel and add the drawings again. The four drawings had 10, 8, 5 and 8 layers; they now have 5, 5, 3 and 5, and the set has 18 layers instead of 31.
Nothing was lost on the way: DIMS became A-ANNO-DIMS with its 3 objects, and the objects of every merged layer are now on its target, which the next step spot-checks.
6. Spot-check the wall layers
The *wall* filter that showed nine layers in step 1 now shows four rows, one A-WALL per drawing. Their object counts are the standard layer's own objects plus everything merged into it — 11, 9, 6 and 7: for Level 1 Plan that is 6 + 3 on WALL + 2 on Walls-New, for Level 2 Plan 5 + 4 on wall, for Roof Plan 4 + 2 on WALLS, and for Sections 5 + 2 on A-WALL-2.
A few rules worth knowing. The layer named in MergeInto has to exist in that drawing already; a drawing with none of your standard layers needs two runs — rename one layer to the standard name first, then merge the rest into it. A row can rename or merge, not both. Layer 0, and layers that come from an XREF, can't be merged away, and the preview marks them as blocked. Merging changes which layer the objects are on, so objects drawn ByLayer take on the target layer's color, linetype and lineweight; if the standard layer is new to a drawing, set those on it in the same workbook.
Everything is backed up before it is written, and Rollback All on the report restores the originals. The same workbook also renames layouts and changes layer colors and states, and the Clean Up mode removes unused layers left behind. For a full walkthrough of every screen and setting, see the LayerSync docs. To try it on your own drawings, download LayerSync — the Free tier covers up to 10 drawings per run.