
Rehberler/Drawing standards
Change Page Setup in Multiple AutoCAD Drawings at Once — Plot Device, Paper Size, CTB and Scale
 LayerSync ile hazırlandı
Güncelleme: September 30, 2026
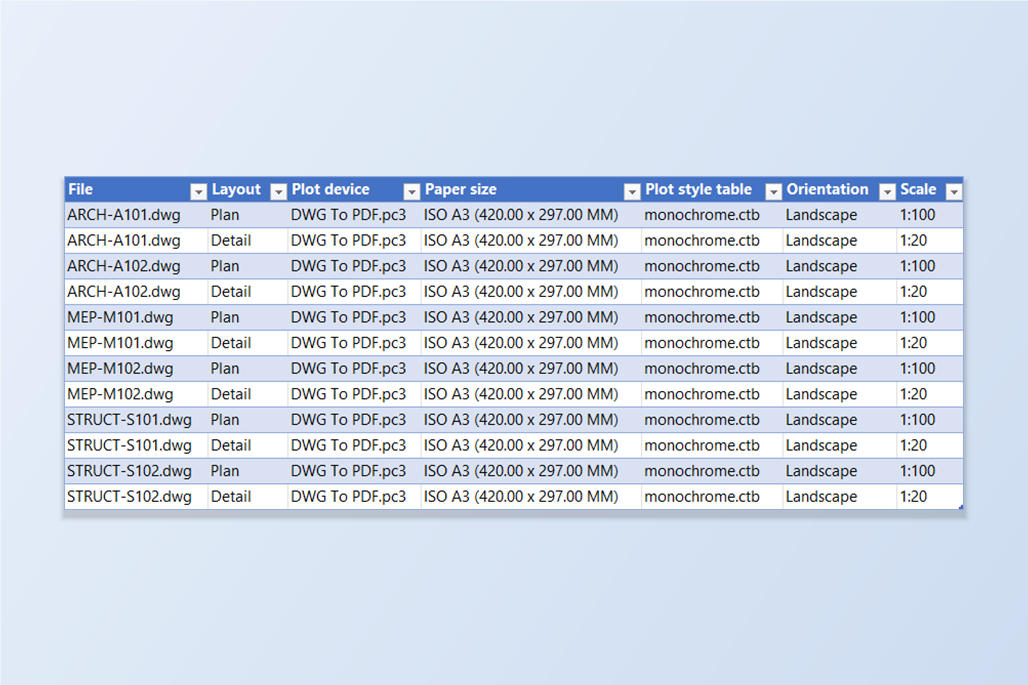
Every layout carries its own page setup: the plot device, the paper size, the plot style table, the orientation and the scale. Drawings that come from different offices, or were made on different computers, disagree on all of them. A layout added on a laptop quietly picks up that laptop's default printer, and a batch plot then produces pages of mixed sizes, some in color and some not.
AutoCAD's Page Setup Manager works on the drawing that is open, and PSETUPIN imports named page setups one drawing at a time. Bringing forty drawings in line therefore means opening each one, checking every layout and retyping the same choices, or writing a script and trusting it with your DWGs.
This guide uses LayerSync to read the page setup of every layout in a set, apply the settings you want to the layouts you pick, and write them back with a preview and a backup. The example is six drawings with two layouts each, Plan and Detail, that all start with different setups. The Free tier handles up to 10 drawings per run.
1. Scan the drawings and see what each layout uses
Open LayerSync, add the drawings with Add Files… or Add Folder…, and let it scan them. Collapse the Files list to give the grid room, then open the Layouts tab. It has one row per paper-space layout per drawing (Model is never listed), and next to the name and tab order it now shows the page setup: Plot device, Paper size, Plot style table, Orientation, Plot area, Scale, and the Centered, Lineweights and Transparency check boxes.
Here the twelve layouts use five different plot devices, paper sizes from A4 to A3, two plot style tables or none, and scales from 1:1 to 1:100 or Fit. A device you didn't expect, such as a home printer, is exactly what this view is for.
2. Set the page setup for the layouts you pick
The bar above the grid is Set for shown layouts. Whatever you fill in there is written into every layout the search currently shows. Type Plan into the Search box first, so only the Plan layouts are listed, then fill in Plot device, Paper size, Plot style table, Orientation and Scale. Search accepts wildcards such as Sheet-*, and a plain word matches any layout name that contains it.
Here the device is DWG To PDF.pc3, the paper size ISO A3 (420.00 x 297.00 MM), the plot style table monochrome.ctb, the orientation Landscape and the scale 1:100. The paper size list offers the sizes of the device you typed, under the same names as AutoCAD's Page Setup dialog. Click Apply to shown and the grid updates.
Then search for Detail, change only the scale to 1:20 and click Apply to shown again. A box left empty, or a check box left grey, keeps that setting as it is.
3. Preview before anything is written
Click Write Directly…. LayerSync compares every edited value with what is in the drawing and lists each change on the Diff Preview screen. Here it reports 6 files previewed, 38 changes and 0 blocked. Select a drawing and open its Layouts tab to see the details: in ARCH-A101 the Plan layout changes device, paper size and plot style table, and the Detail layout also changes its orientation from Portrait to Landscape.
Values the computer can't accept are listed as Cannot write with the reason, such as a plot device that isn't installed or a paper size the device doesn't offer, instead of being skipped silently. Nothing is written until you confirm.
4. Write the changes
Click Write Selected Files and confirm. With Automatic backup checked, LayerSync copies each drawing to a backup folder first, writes the page setup, then reads every changed value back out of the saved drawing. The report shows 6 files succeeded, 0 failed and 0 read-back mismatches, and where each backup went.
Rollback All on the same screen restores every drawing in the run from its backup, and Restore Backup… does the same later.
5. Check the result
To check it independently, read the drawings again. In this example all twelve layouts came back with plot device DWG To PDF.pc3, paper size ISO A3 (420.00 x 297.00 MM), plot style table monochrome.ctb and orientation Landscape, the six Plan layouts at 1:100 and the six Detail layouts at 1:20.
The set is now consistent, so PUBLISH, or any plot run that uses each layout's own page setup, gives every page the same size and style.
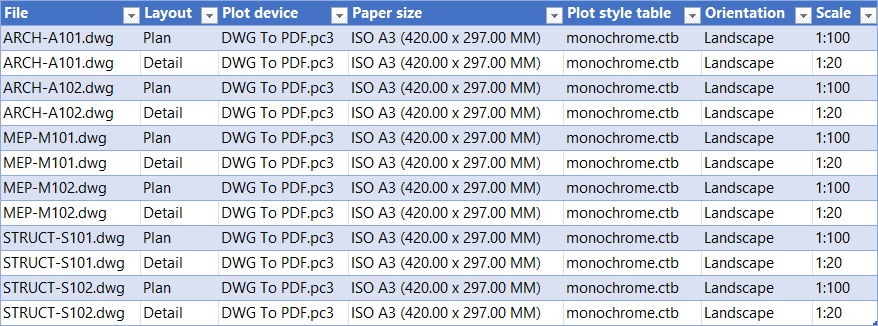
The same page setup can be edited in Excel instead: Export to Excel… puts the columns on the Layouts sheet, with drop-down lists of the plot devices, the plot style tables and, for each row, the paper sizes of that row's device. Change the cells, then use the Excel → AutoCAD screen to preview and write them back. A column you delete is simply not written.
A few rules come from AutoCAD itself. The plot area can be set to Layout, Extents or Display, while Limits, View and Window are shown but not written. Centered is offered only when the plot area is Extents or Display. Changing the paper size keeps the orientation you see, unless you set a new one. For a full walkthrough of every screen and setting, see the LayerSync docs. To try it on your own drawings, download LayerSync — the Free tier covers up to 10 drawings per run.